For everything there is a season, and with this post on one of summer’s classic favorite fruits, we publish our final recipe. We know many of you loved trying out the recipes over the years and this post on creamy frozen strawberry squares will be no exception!
While this is the final new recipe/post for this blog – the entire searchable library of recipes will remain here on the site as always. The recipe search option can be used to find recipes that feature a certain ingredient, or perhaps an old favorite.
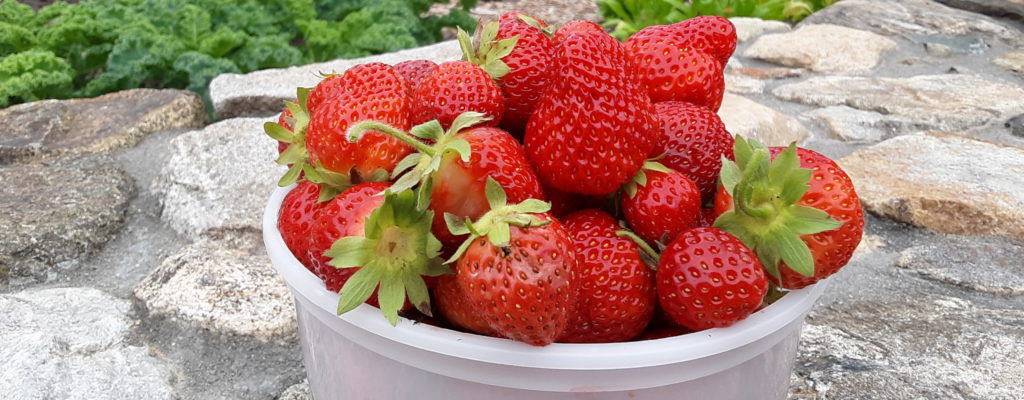
Today’s post features the strawberry – so abundant in the summer months!
Its surplus gives thoughts to strawberry rhubarb pie, a sisterhood favorite, the time honored classic strawberry shortcake, as well as other new ideas. A particularly bumper crop of strawberries this year has given us an opportunity to experiment and try some fresh ideas. After working with different combinations of crunchy crumbs and creamy strawberry fillings, this one proves to be a winner and captures the essence of Summer!
While the posts for this website are ending, we will be continuing to publish “Daily Bread” – a daily spiritual meditation on the Community of Jesus website that includes an excerpt from the Liturgy of the Hours, a meditation, a prayer and the lectionary readings. The “Daily Bread” can also be delivered to your mailbox.
In a large bowl, toss together topping ingredients and then spread out on a baking sheet
Toast in oven until walnuts are fragrant and crumbs are golden. Set aside.
Creamy Strawberry Filling
Spray a 8x11 or 9x13 pan with nonstick spray
Place strawberries in blender and puree until smooth (saving a few whole ones aside for garnish)
In mixing bowl, beat heavy cream until stiff peaks form; set aside in another bowl
In same mixing bowl, beat cream cheese and powdered sugar until creamy, then add condensed milk, vanilla, pureed strawberries;mix slowly until combined
Fold in whipped cream, until partially blended
Spread half of the toasted crumbs into baking dish, followed by strawberry filling
Sprinkle remaining crumbs on top and place in freezer for 2 or more hours, until frozen
When thoroughly frozen, remove from freezer 1 half hour before serving; cut into squares and serve with whipped cream topping and fresh strawberry garnish
We are blessed with three very large vegetable gardens. This week, our task list was large for the “veggie volunteers”: tying up the cucumbers and tomatoes, doing our second planting of lettuce, picking and processing kale, beets, and swiss chard, and our other ongoing tasks such as weeding, mowing, string trimming, and watering. We’ve been in near-drought conditions here on the Cape, so we were grateful for our unexpected late Saturday afternoon rain shower.
There is nothing more satisfying to me than harvesting the vegetables you have grown from seed and then being able to create something tasty and delicious. I always wonder if God might be smiling at the pleasure He gives us when we co-create with Him.
Print Recipe
Votes: 0
Rating: 0
You:
Rate this recipe!
Kale Salad with Blueberries, Beets, Quinoa and Avocado
Rinse the quinoa with cold water in a sieve. Place in a saucepan with 1 1/2 cups cold water and 1/2 tsp salt. Bring to a boil. Reduce heat to low and cover, cook for an additional 10 min. or until the water is absorbed. Remove from heat and let sit until cool.
Make the vinaigrette by combining all the ingredients and whisk well. Adjust taste, adding a bit more honey if you want a sweeter version.
Using a spiralizer, spiralize your beets on the "Angel Hair" or "Spaghetti" attachment. You can also buy them already spiralized if you want to skip this step, or you can grate or julienne them by hand. You do not need to cook the beets, they are eaten raw. Set aside.
Place the chopped kale in a large bowl and add the dressing. Massage the dressing into the kale with your hands.
Add the quinoa to the bowl along with the blueberries and feta cheese and toss gently.
Put the salad on a platter or in a serving bowl and add your avocado chunks. Top with your spiralized beets. Sprinkle with toasted almonds or sunflower seeds, if desired.
The spiralizer is a kitchen utensil with fine blades that can slice raw vegetables and fruits into an assortment of shapes. If you don't have a spiralizer - simply grate the beets, or julienne them by hand.
Sunday breakfast is an opportunity to make something a bit more special in the Convent. With the start of summer and still in our quasi “stay at home” status, this Sunday was no different. These scones laced with Cape Cod flavor were the perfect accompaniment to fluffy scrambled eggs and a hot cup of coffee. You can even prepare them the night before and bake them fresh in the morning. We hope you enjoy them as much as we did.
Print Recipe
Votes: 3
Rating: 4
You:
Rate this recipe!
Cape Cod Cranberry Scones with a Summery Lemon Glaze
Sift the flour, baking powder, sugar and salt into a large bowl, add zest of one orange. Cut in butter using a pastry blender until it resembles small peas. Stir in the craisins.
Mix together 1/2 cup milk and sour cream in a measuring cup. Pour all at once into the dry ingredients, and stir gently until well blended. Do not overwork the dough or they will be tough.
With floured hands, pat the dough into one large disk about 1" tall. Place the disk on a cookie sheet lined with parchment and with a sharp knife or bench knife, score into 8 triangles cutting almost all the way through the dough. (If not baking until the next day, cover tightly with plastic wrap and refrigerate at this point.)
Whisk together the egg and 1 tablespoon of milk or heavy cream. Brush the top of the scone with the egg wash and sprinkle with 1 Tbsp. sugar. Let them rest for about 10 minutes.
Bake for 20-25 minutes, until the tops are golden brown, but not deep brown and the scone is cooked through. Cool for about 10 min. while preparing the glaze.
Glaze
Mix the lemon juice with the powdered sugar until dissolved in a microwave-safe bowl. Whisk in the butter and lemon zest. Microwave for 30 seconds and whisk until the glaze is smooth.
Drizzle the glaze over the top of the scones. Let it set a minute before serving. Enjoy!
The idea of a one-pot meal has always appealed to me. The fact that a whole meal can be prepared and everything you need for sustenance is in one pot? Magical. The absence of extra dishes piling up on the counters during meal prep also doesn’t hurt, either.
During a quarantine-inspired cleaning frenzy, I came across a cookbook that was given to us as a gift, “Cook It In Your Dutch Oven.” This tried-and-true kitchen essential from the clever folks at America’s Test Kitchen is an absolute treasure. This dish-defying cookbook was a welcome find, with recipes for one-pot meals, bread (bread!) and other side accompaniments. This week’s blog is adapted from the recipe for Classic Chicken Curry. I hope you give it a try!
Don’t have a Dutch oven? No problem! Swap it out for a soup or stock pot, slow-cooker crock pot or any heavy deep pot you have in the kitchen. For this recipe, I used a cast iron pot.
Print Recipe
Votes: 0
Rating: 0
You:
Rate this recipe!
One-pot Chicken Curry
Adapted from Cook It In Your Dutch Oven, an America’s Test Kitchen publication
Melt butter in the bottom of the Dutch oven or pot of choice on medium heat. Add curry powder, optional spices (if desired), salt and pepper. Cook until fragrant.
Add onion and cook until translucent. Stir in garlic and ginger and cook until fragrant, about 30 seconds.
Add chicken and water to the pot and bring to a simmer. Cover pot and reduce heat to low until chicken reaches an internal temperature of 160 degrees, about 22 minutes. Turn the chicken halfway through cooking. When done, remove from pot and let cool.
Add potatoes to pot with a pinch of salt. Cover and cook until just fork tender. Add cauliflower and cook, stirring occasionally until potatoes are fully cooked, about 15 minutes.
While potatoes are cooking, shred chicken into roughly 2 inch pieces with a fork and set aside.
Once potatoes are cooked, stir in chicken and peas until just warmed through. Turn off the heat and add yogurt. Season with salt and pepper to taste and serve.
*As curry is a blend of spices, I like to add an extra pinch of my favorites: turmeric and cumin. These can be found in traditional curry blends and I like to play these up a little more. Feel free to omit, or try your own variation based on your tastes.
I never expect to see shiny, plump and beautiful eggplant in the grocery store until mid/late summer, but we’ve gotten lucky this year as a booming crop became readily available in our local market (unlike the empty paper towel and toilet paper shelves!) Since this is one of my favorite summer comfort foods, I thought I’d share and old world recipe with you. (If you want to skip a step and use purchased tomato sauce, that’s a great time saving option.)
You might ask why you need to soak your eggplant in salt water first. This does two things: it draws out any of the bitter juices that can be found in older eggplant and tightens up the flesh, making the eggplant less likely to soak up too much oil when you are frying them. This recipe will make 2 – 9×13″ pans. Since it can be a bit time consuming to make, it enables you to put one pan away in the freezer for another time.
Wash eggplant. Remove the top and bottom from the eggplant and slice across into 1/2" rounds (no need to peel) Submerge in a large bowl of cold water with 3 Tbsp Salt. Put a plate across the top of the bowl to keep the eggplant submerged. Let soak 30 min to 1 hr.
Prepare the sauce: In a medium pot on top of the stove, heat the oil and add diced onion and a teaspoon of sugar. Cook over low heat until the onions are translucent and soft.
Add the torn basil leaves, oregano and garlic. Continue cooking for another minute, watching that the garlic doesn't burn. Add the the salt and pepper and the tomatoes and the remaining sugar, if desired.
Continue cooking over low heat until the flavors meld. Let simmer 30 min. Adjust seasonings to taste.
Drain eggplant and dry on paper towels
Mix together the Flour, salt and pepper on one plate. In a second large shallow bowl or pie plate, beat the eggs together.
One at a time, dip the eggplant in the seasoned flour and then in the beaten eggs
Heat oil in a large skillet or fry pan
Fry the eggplants until golden on one side and then turn to continue frying on the other side. Remove to a paper lined sheet pan.
When all the eggplant are fried, you are ready to assemble!
Assemble
Spray two 9X13" pan with PAM spray
Put a thin layer of tomato sauce on the bottom of each pan
Lightly sprinkle with the grated pecorino romano cheese
Layer the eggplant slices - touching but not overlapping
Sprinkle grated mozzarella over
Lightly sprinkle with grated pecorino romano cheese
Continue layering in this order:
Sauce
Eggplant
Pecorino Romano
Mozzarella
Sauce
Eggplant
Pecorino Romano
Sprinkle Chopped Parsley
Mozzarella
End with Sauc
Cover with foil and bake at 350 degrees F. for 45 min. Let rest 10-15 min.
What encouragement from God as we move through these challenging days! Hope coming up against fear; love and care for one another, binding us together. And often, this can take place in the simplest of ways. Sometimes a group of our Sisters prepares a surprise treat in the middle of a hard day. The sharing of time, generosity, and love in the form of delicious food reminds us of this essential truth: God is Victor over all—He is with us in all circumstances!
Preheat oven to 350 degrees. Line a baking sheet with parchment paper
Whisk flour and dry ingredients together and set aside.
In an electric mixer, with the paddle attachment, beat butter and sugars until light and fluffy. Add eggs, one at a time, beating well after each addition. Blend in vanilla.
Gradually add dry ingredients until just combined; fold in grated carrots.
Using a tablespoon, scoop out 12 generous “balls” onto a baking sheet. With dampened fingers dipped in brown sugar, gently flatten,
Frosting Instructions
Beat together butter and cream cheese until smooth
Add powdered sugar and beat until creamy and lump-free
Add vanilla, coconut and coconut flavoring and salt
When the cookies have cooled, match up sizes and fill with frosting!


")
")


