Italian Strawberry Crostata

We’ve been cooking up lots of strawberry jam for Christmas gifts with this summer’s bountiful crop of berries from our garden.  One of our sisters has been dying to make a strawberry tart with it and today she did.

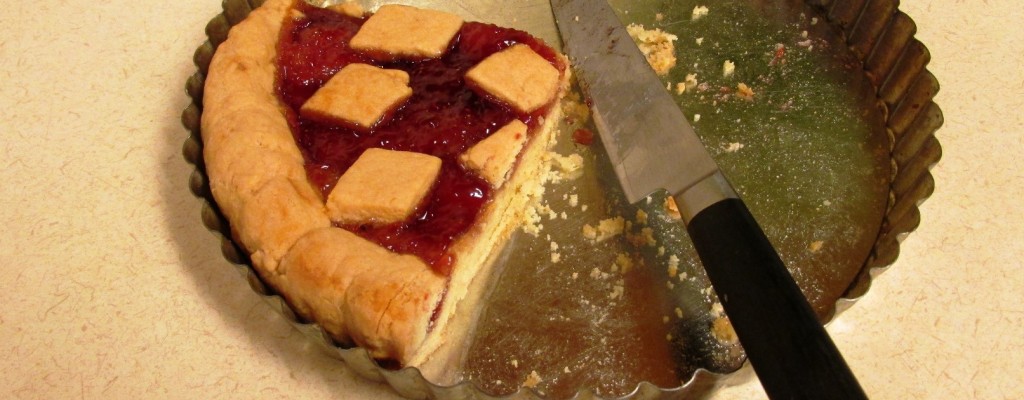
I loved the looks of it when it came out of the oven. I loved the taste of it even more, as did some of the other kitchen sisters who sampled it. The unusual flavor of fresh lemon zested crust was a taste treat in itself even without the filling.

“Leave it right here”, I said “I’ll be back in a minute to take a picture. This has to be a blog!”  Locating the camera as quickly as possible I returned to take this photo…..

Print Recipe
Votes: 0
Rating: 0
You:
Rate this recipe!
Italian Strawberry Crostata
The pastry for this simple jam tart is made with olive oil and flavored with vanilla, lemon rind and a little alcohol, which makes it tender. It is an easy, smooth dough to handle and does not go hard when stored in the fridge.
SERVINGS
1pie
CHANGE SERVING SIZE
pie
COOK TIME
30mins.
PREP TIME
READY IN

Ingredients

Instructions

  1. Heat oven to 325 degrees Fahrenheit.
  2. Mix together flour, sugar, baking powder and salt on a clean surface. Lightly beat together eggs, oil, vanilla, alcohol and rind. Make a well in the dry ingredients and add the egg mixture.
  3. Using your hands, work the flour in gradually to form a dough. Work dough lightly until it comes together into a smooth ball.
  4. Divide dough into 3 pieces. Roll out all pieces to about 1/2 inch thickness. Press 2 of them into the base of 9-10 inch sallow baking pans. Spread each generously with jam.
  5. Cut remaining piece of dough into very thin long strips. Form a ring around edge of dough and make a criss-cross pattern on top of the tarts. Cut tiny diamonds of leftover dough and place into the center of each criss-cross.
  6. Bake for 30 minutes, until lightly golden.

Notes:

P.S. — We added a few fresh berries on top of the jam the second time we tried it, and felt it added yet another dimension of wonderful flavor.

Hot Cross Buns

Countless stories surround the origin and the history of hot cross buns. Suffice it to say they are eaten as a simple little sweet during Lent after weeks of abstinence and looking towards the crucifixion. It is our tradition to serve them here at the Community of Jesus every Good Friday.

There is one little saying about them that I particularly like. It is said that a bun baked on Good Friday and hung in one’s kitchen will guarantee the success of all baked goods prepared in that kitchen. Worth a try?

HOT CROSS BUNS

Print Recipe
Votes: 0
Rating: 0
You:
Rate this recipe!
Hot Cross Buns
SERVINGS
CHANGE SERVING SIZE
COOK TIME
20minutes
PREP TIME
READY IN
55-60minutes

Ingredients

Instructions

  1. Dissolve yeast and sugar in warm water and let stand 10 minutes in mixer until foamy.
  2. Add softened butter, instant powdered milk, egg, egg white. Mix well with dough hook.
  3. Add salt and flour only adding enough flour until dough is slightly sticky.
  4. Add citron and currants and cinnamon
  5. Continue to add rest of flour until the dough is soft and smooth and not too sticky to handle. You may not need all of your flour.
  6. Mix on slow for another 5 minutes – this will knead the dough.
  7. Let rise in mixer bowl until double in size.
  8. Punch down on floured surface, cover, and let rest 10 minutes.
  9. Shape into 12 balls and place in a greased 9 x 12 inch pan.
  10. Cover and let rise in a warm place till double, about 35-40 minutes.
  11. Mix egg yolk and 2 tablespoons water. Brush on balls.
  12. Bake at 375 degrees F (190 degrees C) for 20 minutes. Remove from pan immediately and cool on wire rack.
  13. To make crosses: mix together confectioners’ sugar, vanilla, and milk. Brush an X on each cooled bun.

Creamy Tangerine Custard

Have you noticed, how tangerines have broken into the food scene of late? Having made their debut they are now showing up in a variety of exciting new ways. I can’t think of a more pleasant or deserving fruit for this to happen to. This simple little citrus, which for so long has primarily been eaten as a plain healthy snack, with just a bit of “dressing up”, turns into a stunningly beautiful dessert with distinctive flavor and tangy zip and sparkle.

I am considering using this recipe for our Easter dinner dessert. So often I’ve chosen a light yellow lemony one for this meal but I’m thinking a tangerine creation could be a colorful, lovely and refreshing change. Of course, there’s no need to wait till Easter.  Why not try it for an early spring lunch or dinner to usher in the warmer weather?

Creamy Tangerine Custard Dessert 

Print Recipe
Votes: 0
Rating: 0
You:
Rate this recipe!
Creamy Tangerine Custard
SERVINGS
CHANGE SERVING SIZE
COOK TIME
3minutes
PREP TIME
READY IN
2hours

Ingredients

Instructions

  1. Whisk together first 3 ingredients in a 3-quart heavy saucepan.
  2. Whisk in tangerine juice until smooth.
  3. Remove 1 (2-inch) strip of peel from tangerine, using a vegetable peeler, and add to pan.
  4. Bring to a boil over medium-low heat, stirring occasionally; boil, stirring constantly, 1 minute or until mixture is thick and bubbly.
  5. Remove pan from heat.
  6. Whisk eggs until frothy.
  7. Gradually whisk 1/4 cup hot juice mixture into eggs; add egg mixture to remaining hot juice mixture, whisking constantly.
  8. Return to heat, and cook, stirring constantly, 2 minutes or until thickened.
  9. Transfer mixture to a medium bowl; stir in butter and extract until butter is melted. Discard peel.
  10. Place heavy-duty plastic wrap directly onto warm custard (to prevent a film from forming); chill 2 hours. (Mixture will thicken as it chills.)

Garnishes: any citrus slices or mandarin, mint 

Little Nectarine Cake

We are exceptionally fortunate to have a variety of fruit trees so close to the convent where we can actually see the fruit daily ripening on their branches. I never tire of watching them, year after year, as they develop from buds and blossoms to fully formed peaches, plums, pears and apples. Right now nectarines are the main attraction and center stage in all their beauty, with peaches just behind waiting in the wings to make their appearance.

There is a sweet little cake with a zesty fresh lemon flavor that lends itself perfectly as an accompaniment to any fresh fruit.  It is a simple to mix batter into which you add slices of your choice of fruit according to the season; apricots, peaches and apples. It is surprisingly versatile and appealing and can be served in many ways.  Lovely all by itself with a cup of tea, or alongside a dish of fresh fruit, it also packs nicely into a lunch box or picnic basket. This morning a beautiful basket of freshly picked nectarines appeared on the kitchen counter, some of them still on their leafy branches. This afternoon we made little nectarine cakes. They all disappeared in no time.
Little Nectarine Cake
Print Recipe
Votes: 0
Rating: 0
You:
Rate this recipe!
Little Nectarine Cake
SERVINGS
12muffins
CHANGE SERVING SIZE
muffins
COOK TIME
20mins.
PREP TIME
READY IN

Ingredients

Instructions

  1. Preheat oven to 350°.
  2. Coat 12 muffin cups with non-stick spray.
  3. Whisk flour, baking powder, and salt in a medium bowl.
  4. Using an electric mixer, beat butter and sugar in another medium bowl, until light and fluffy about 2 minutes.
  5. Add egg, lemon zest, and vanilla and beat until combined.
  6. With mixer on low speed, add dry ingredients in 3 additions alternately with milk in 2 additions, beginning and ending with dry ingredients.
  7. Divide batter among muffin cups (cups will be only 1/3 full) and smooth tops.
  8. Top with nectarine slices and sprinkle with sugar.
  9. Bake until cakes are golden and toothpick comes out clean, 20-25 minutes.
  10. Transfer pan to a wire rack; let pan cool 5 minutes, then transfer cakes to a rack and let cool completely.
  11. Cakes can be made one day ahead. x
  12. Cakes can be made one day ahead.
  13. Store airtight at room temperature. Makes 12.

Fresh Fruit Meringue

Fresh summer fruits and berries are a dessert maker’s delight.  Cool, colorful and light they are the perfect compliment to any warm weather meal without doing a thing to them.  But with a minimal amount of work they can also become a stunning offering of charm and elegance to send a meal over the top. What I am describing is a Pavlova-like cream filled meringue that showcases a few choice favorite fruits as a breathtaking jewel of a dessert, a striking finale to any lunch or dinner that can take the meal from ordinary to sublime.

Fresh Fruit Meringue
Print Recipe
Votes: 0
Rating: 0
You:
Rate this recipe!
Fresh Fruit Meringue
SERVINGS
CHANGE SERVING SIZE
COOK TIME
60-70mins.
PREP TIME
READY IN

Ingredients

Instructions

  1. Place rack in the middle of the oven and preheat the oven to 275°.
  2. Line a large baking sheet with parchment paper.
  3. Pour the vanilla and vinegar (if using) into a small cup.
  4. Stir the cornstarch into the sugar in a small bowl.
  5. In a large bowl of a heavy-duty mixer, fitted with a whisk attachment, whip egg whites, cream of tartar (if using) and salt, starting on low, increasing incrementally to medium speed until soft peaks/ trails start to become visible, and the egg white bubbles are very small and uniform, approximately 2 to 3 minutes.
  6. Increase speed to medium-high, slowly and gradually sprinkling in the sugar-cornstarch mixture.
  7. A few minutes after these dry ingredients are added, slowly pour in the vanilla and vinegar (if you didn’t use cream of tartar.)
  8. Increase speed a bit and whip until meringue is glossy, and stiff peaks form when the whisk is lifted, 4 to 5 minutes.
  9. Pipe or spoon the meringue into rounds that are 3 inches wide on a baking sheet lined with parchment paper or a silicon liner.
  10. With the back of a spoon, create an indentation in the middle of the mound for holding the filling once meringue is baked.
  11. Place baking sheet in the oven. Reduce oven temperature to 250° Fahrenheit.
  12. Bake for 50 – 60 minutes, or until the meringues are crisp, dry to the touch on the outside, and white—not tan colored or cracked. (The interiors should have a marshmallow-like consistency.)
  13. Check on meringues during the baking time.
  14. If they appear to be taking on color or cracking, reduce temperature 25 degrees, and turn pan around.
  15. Gently lift from the baking sheet and cool on a wire rack.
  16. Will keep in a tightly sealed container at room temperature, or individually wrapped, for up to a week if your house is not humid.
  17. Serve topped with whipped cream and crushed or whole berries and your choice of assorted fruits.

Strawberry Whipped Cream Rolls

It is strawberry time!  And the sight of those tubs full of beautiful juicy red berries that the sisters are bringing in every morning is a joyful one to behold.  It makes me so happy just to look at them and I see a smile come over the face of each person who sees them.

This week we will celebrate the 80th birthday of one of the sisters with old fashioned fresh strawberry shortcake made with traditional biscuits and whipped cream. In the days ahead different sisters will volunteer to make their favorite strawberry desserts and I am making a request right now for my mother’s special strawberry whipped cream rolls. Helping her make them is one of my most pleasant childhood memories.

 Strawberry Whipped Cream Rolls

Print Recipe
Votes: 1
Rating: 5
You:
Rate this recipe!
Strawberry Whipped Cream Rolls
SERVINGS
9servings
CHANGE SERVING SIZE
servings
COOK TIME
25mins.
PREP TIME
READY IN

Ingredients

Instructions

Sponge cake:
  1. Combine flour and baking powder, set aside.
  2. In a bowl beat eggs with an electric mixer on high speed about 4 minutes or until thick.
  3. Gradually add sugar; beat at medium speed for 4 to 5 minutes or until light and fluffy.
  4. Add the flour mixture; beat at low to medium speed just until combined.
  5. In a saucepan heat and stir the milk and butter until butter melts; remove from heat and add vanilla extract.
  6. Add milk mixture to the batter, beating until combined.
  7. Pour into a greased, wax-papered jelly roll pan.
  8. Bake at 350 degrees for 15 minutes or until golden but not dry.
To assemble:
  1. Cool and cut into 4 ½ inch squares.
  2. Spread with sweetened whipped cream.
  3. Place sliced strawberries on whip cream, roll up and sprinkle with confectioners’ sugar.
  4. Wrap tightly in waxed paper and refrigerate until serving.
  5. Great to pack in lunches or picnic baskets–fancier dressed up with extra sliced berries and cream as a plated dessert.