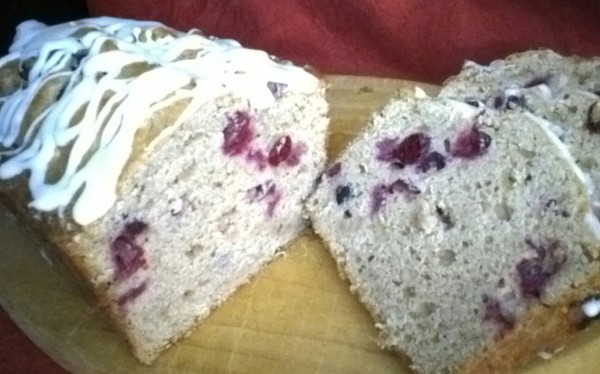
Today I am looking out on a winter wonderland! We are in the midst of a blizzard that has dumped an amazing amount of snow as far as the eye can see. One of those days to sit by the fire with a hot cup of tea and a slice of warm Apple cranberry bread.
We still have apples in the refrigerator from our fall harvest which are in surprisingly good shape – the one I munched on while making this bread wasn’t fresh from the tree, but still crisp and sweet. We also were given a large quantity of cranberries from a local bog, so it seemed like a good use of the two to put them together in a quick bread. We are always looking for different morning snack ideas to serve at our community work time break. I tried a couple of different recipes and actually left the peels on the Apple’s to give the breads a little more texture. Here is one variety that I thought the most flavorful and moist.
Print Recipe
Votes: 0
Rating: 0
You:
Rate this recipe!
Apple Cranberry Bread
SERVINGS1loaf
|
COOK TIME45-55minutes |
PREP TIME |
READY IN10minutes |
Ingredients
Instructions
- Heat oven to 350 degree F. Grease bottom only of an 8 x 4 inch loaf pan
- In large bowl, mix 3/4 cup sugar, the oil and egg.
- Stir in apple, flour, baking soda, baking powder and salt. Stir in cranberries.
- Spoon batter into pan.
- In small bowl, mix 1 Tablespoon sugar and the cinnamon; sprinkle over batter.
- Bake 45 to 55 minutes or until toothpick inserted in center comes out clean.
- Cool 10 minutes. Remove from pan and cool completely on wire rack before slicing.
Optional Glaze
- For glaze, combine confectioners sugar and half and half or milk, drizzle over bread.
It is a sunny, slightly warm day here on the Cape, but cold weather is on its way again soon. I’m not quite ready for spring, though, I am still waiting for the BIG snow of the season. We did have a couple of snow falls of a couple of inches, but I would really love a good 10 to 12 inches. Snow is also great for the garden, and we are already planning what vegetable seeds to buy, along with starting another plot for a garden, so please pray that we get the big storm!
I recently had a birthday and was given one of my favorite desserts — a coconut cream trifle. I have served this in little glasses, and called it coconut cake in a glass — and it is truly divine. This recipe is a little complicated and time consuming, but I promise it is well worth the effort for any event or family gathering.
Coconut Cake in a Glass, or Coconut Cream Trifle
Print Recipe
Votes: 0
Rating: 0
You:
Rate this recipe!
Coconut Cake In A Glass, Or Coconut Cream Trifle
SERVINGS
|
COOK TIME30mins. |
PREP TIME |
READY IN40mins. |
Ingredients
Instructions
First make the simple syrup:
- Bring water and sugar to a boil.
- Stir in the coconut, remove from the heat and let sit for about 30 minutes.
- Strain the liquid into a clean saucepan, bring to a boil and let cook until the mixture is slightly reduced, about 5 minutes.
- Let cool.
Then the custard:
- Bring milks to a simmer over low heat in a nonreactive saucepan.
- Whisk together the yolks, sugar, and cornstarch in a large bowl.
- Whisk in a small amount of the milk mixture to the egg mixture to temper the eggs, then slowly whisk in the rest until smooth.
- Return mixture to the pot over medium heat, and bring to a boil, whisking constantly, until thickened.
- Scrape mixture into a bowl, and whisk in the rum and vanilla extract. Let cool to room temperature, then cover with plastic wrap and refrigerate until cold.
Now the cake:
- Preheat the oven to 350 degrees F.
- Generously butter and flour 2 (9″by 2″) cake pans and line bottoms with parchment paper.
- Whisk together the milk, egg whites, vanilla in a medium bowl.
- In the bowl of a mixer fitted with a paddle attachment, mix together the flour, sugar, baking powder and salt.
- With mixer running at low speed, add the butter, one piece at a time, and continue beating until mixture resembles moist crumbs.
- Add all but 1/2 cup of milk mixture to crumbs and beat at medium speed until the mixture is pale and fluffy, about 1 1/2 minutes.
- With mixer on low speed, add remaining milk mixture, increase speed to medium and beat 30 seconds more.
- Scrape sides of bowl and mix for another 20 seconds.
- Divide batter between the 2 pans and smooth tops with a spatula.
- Bake until a toothpick inserted into the center comes out with a few crumbs attached, about 22 to 24 minutes.
- Cool for 10 minutes on a rack, then invert onto the rack, removing the parchment. Let cool completely.
- Toast the 1 cup of coconut until golden for topping.
- Whip the 1 1/2 cups of cream, and fold 2/3 of it into the cooled custard for the filling between layers of cake, reserving the last 1/3 for the final layer of the dessert.
To assemble:
- Slice each cake into 2 layers, brush with the simple syrup, and then chunk up into bite size pieces.
- You can make these either individually in glasses, or for a crowd in a large glass bowl.
- Put a layer of cake pieces in the bottom of your container, then a layer of the custard mixture, continuing until your container is full, final layer being the last 1/3 of the whipped cream, and sprinkle with the toasted coconut.
- This is most delicious if you refrigerate it for a couple of hours so the flavors meld.
The “Versatile Little Christmas Cookie”
By now I’m sure you have been thinking about Christmas goodies that you might want to have on hand for gifts, snacks, holiday visits or little last minute remembrances that come to mind even when you think you’ve covered everyone on your list. We all have our special favorites, without which Christmas just wouldn’t be Christmas.
Biscotti, another European favorite that has grown rapidly in popularity everywhere over the years, is perfect for this. I learned how to make them as a teenager at a time when they were not as common as they are now — unless you lived in an Italian household or had a friend or neighbor as we did. Rosie Di Rocca, a first generation Sicilian, lived a few doors away from us. She baked biscotti all year round and whenever she did, she shared them with us and taught me how to make them.
Over the years I’ve tried many different recipes and versions of this classic Italian goody but I always come back to her basic recipe, simply seasoned with anise seeds and flavoring. However there are endless variations on this versatile cookie that can be made according to your personal tastes by adding candied or dried fruits or nuts. Use your favorite flavorings: vanilla, almond, orange, lemon zest or liqueur. Dip or drizzle them with a chocolate glaze* or sprinkle with confectioners sugar. Baked twice, (which is what biscotti literally means) they store beautifully in an airtight container, crisp and crunchy for a month or more.
For a different way of serving them- keep a log of dough in the refrigerator and when unexpected guests drop in during the holidays, bake them only once, slice and serve them soft and warm on the spot. There is so much you can do with them. Just use your imagination and have fun with biscotti this Happy Holiday season.
Print Recipe
Votes: 0
Rating: 0
You:
Rate this recipe!
Biscotti
SERVINGS36cookies
|
COOK TIME40-45mins. |
PREP TIME |
READY IN |
Ingredients
Instructions
Biscotti
- Cream butter and cream cheese together.
- Add sugar gradually, beating thoroughly after each addition.
- Beat in eggs one at a time; continue beating until mixture is light and fluffy.
- Mix together flour, baking powder and salt.
- Add this dry mixture to the creamed mixture; mix well.
- Add flavoring and mix well.
- Divide dough in thirds; place on a lightly greased cookie sheet, and form into 3 rolls the length of the baking sheet and 1 1/2 inches wide.
- Bake at 350 degrees 30 to 35 minutes or until light brown.
- Remove from oven and cut rolls crosswise into slices about 3/4 inch thick.
- Place on cookie sheet cut side down.
- Return to oven.
- Bake 10 minutes longer or until toasted and crisp.
Chocolate Glaze
- heat 1/2 cup cream until hot but not boiling; Add chocolate chips til desired thickness.
Makes about 1 cup of chocolate glaze
