Years ago when I was younger and had more energy, I frequently made a marvelous chocolate cake. It was really superb, but very labor intensive and time consuming. For example, it had to be baked in a pan lined with a well buttered brown paper bag cut to the exact size of the pan. This was essential to its success.
It required sour cream, butter, lots of brown sugar and many squares of dark chocolate melted to a very specific temperature and then carefully beaten for just the right length of time into a rich velvety fudge frosting.
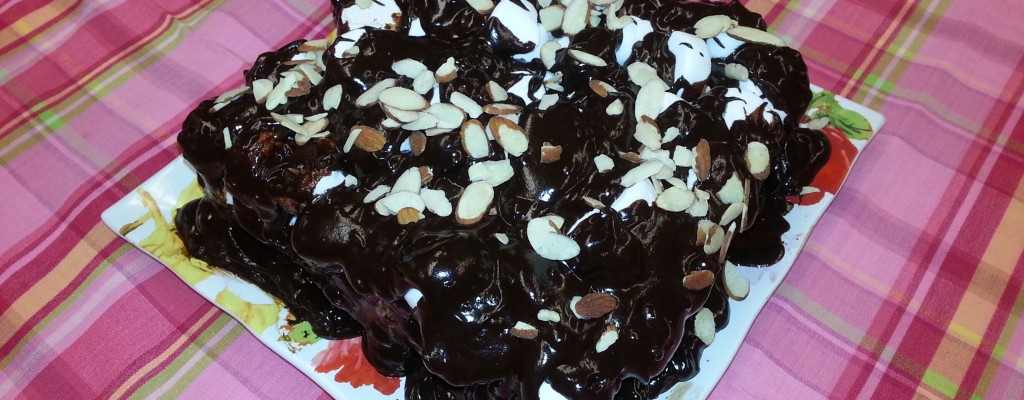
At the moment I am unable to locate this precious old recipe originally clipped from a worn yellowed newspaper. I am sure it will show up again someday. Until then I have put together a recipe I like making. It doesn’t begin to compare or compete with Miss Simpson’s authentic prize winner, but it is fast, easy, has ice cream baked into it and satisfies many chocolate lovers who have never tasted the old favorite one I used to make.
Suppose we just call it Chocolate Marshmallow Ice Cream Sunday Cake.
Print Recipe
Votes: 0
Rating: 0
You:
Rate this recipe!
Chocolate Marshmallow Ice Cream Sunday Cake
SERVINGS
|
COOK TIME40mins. |
PREP TIME |
READY IN |
Ingredients
Instructions
Chocolate Marshmallow Ice Cream Sunday Cake
- Preheat oven to 350 degrees.
- Follow cake mix directions on box.
- Bake for 40 minutes.
- Remove from oven and while still hot cover top with at least 20 marshmallows sliced in half crosswise.
- Let melt and cool.
- Remove to serving plate and pour hot ganache over the top and down the sides.
- Sprinkle with your favorite nuts.
Ganache
- Heat half and half in top of double boiler to scalding point. Do not boil – add chocolate chips and stir until thoroughly melted.
- Add flavoring and pour immediately on to cake.
- Tip: If you melt the chocolate chips first and then add cold half and half the chocolate will seize up. The half and half needs to be the same temperature as the chips before heating or warmer.
It is now Lent. And I should be writing about very Lenten things like soups and bread, not desserts. That will follow later in the season. I’m hoping to do my favorite beef mushroom barley soup in a couple of weeks. So even though a lot of us give up desserts for Lent, I’d like to share my recipe for bread pudding, which can double as a great and satisfying breakfast. It is so wonderful served up warm with whipped cream, or cut into shapes to serve as individual desserts, or as a great snack in the middle of the afternoon. I wanted to make it the way I remember us making it in the early days of the sisterhood, which was to mix up the cubes of bread with butter and cinnamon sugar before adding the eggs and milk or cream. We also used whatever bread was leftover and saved — white and whole wheat, rye… you name it when making the bread pudding. I do love a homemade white bread for this, and especially something like brioche, which I will sometimes make up in large batches and have in the freezer for this sort of use. But that did not happen for this bread pudding, so I was really happy to find a loaf of the cinnamon swirl bread that we gave as gifts for Christmas! But you can use just about any firm white bread for this.
Bread Pudding
Print Recipe
Votes: 0
Rating: 0
You:
Rate this recipe!
Bread Pudding
SERVINGS12servings
|
COOK TIME45 - 50mins. |
PREP TIME |
READY IN |
Ingredients
Instructions
- Heat oven to 350 degrees F.
- Butter a 9 X 13 casserole.
- Place bread cubes in a large bowl, add melted butter and mix well.
- Mix together 1/2 cup of sugar and cinnamon, and add to bread cube mixture again mixing well, so all the cubes are coated.
- In another bowl, whisk together 1 cup sugar, milk, eggs, cream and vanilla, then stir into bread cube mixture.
- Pour all into prepared pan.
- Top with additional cinnamon sugar.
- Bake in 350 oven about 45 to 50 minutes and pudding is puffed and golden.
- Cool slightly. Can be served warm, or chilled and served cold.
- Top with whipped cream if desired.
It is a sunny, slightly warm day here on the Cape, but cold weather is on its way again soon. I’m not quite ready for spring, though, I am still waiting for the BIG snow of the season. We did have a couple of snow falls of a couple of inches, but I would really love a good 10 to 12 inches. Snow is also great for the garden, and we are already planning what vegetable seeds to buy, along with starting another plot for a garden, so please pray that we get the big storm!
I recently had a birthday and was given one of my favorite desserts — a coconut cream trifle. I have served this in little glasses, and called it coconut cake in a glass — and it is truly divine. This recipe is a little complicated and time consuming, but I promise it is well worth the effort for any event or family gathering.
Coconut Cake in a Glass, or Coconut Cream Trifle
Print Recipe
Votes: 0
Rating: 0
You:
Rate this recipe!
Coconut Cake In A Glass, Or Coconut Cream Trifle
SERVINGS
|
COOK TIME30mins. |
PREP TIME |
READY IN40mins. |
Ingredients
Instructions
First make the simple syrup:
- Bring water and sugar to a boil.
- Stir in the coconut, remove from the heat and let sit for about 30 minutes.
- Strain the liquid into a clean saucepan, bring to a boil and let cook until the mixture is slightly reduced, about 5 minutes.
- Let cool.
Then the custard:
- Bring milks to a simmer over low heat in a nonreactive saucepan.
- Whisk together the yolks, sugar, and cornstarch in a large bowl.
- Whisk in a small amount of the milk mixture to the egg mixture to temper the eggs, then slowly whisk in the rest until smooth.
- Return mixture to the pot over medium heat, and bring to a boil, whisking constantly, until thickened.
- Scrape mixture into a bowl, and whisk in the rum and vanilla extract. Let cool to room temperature, then cover with plastic wrap and refrigerate until cold.
Now the cake:
- Preheat the oven to 350 degrees F.
- Generously butter and flour 2 (9″by 2″) cake pans and line bottoms with parchment paper.
- Whisk together the milk, egg whites, vanilla in a medium bowl.
- In the bowl of a mixer fitted with a paddle attachment, mix together the flour, sugar, baking powder and salt.
- With mixer running at low speed, add the butter, one piece at a time, and continue beating until mixture resembles moist crumbs.
- Add all but 1/2 cup of milk mixture to crumbs and beat at medium speed until the mixture is pale and fluffy, about 1 1/2 minutes.
- With mixer on low speed, add remaining milk mixture, increase speed to medium and beat 30 seconds more.
- Scrape sides of bowl and mix for another 20 seconds.
- Divide batter between the 2 pans and smooth tops with a spatula.
- Bake until a toothpick inserted into the center comes out with a few crumbs attached, about 22 to 24 minutes.
- Cool for 10 minutes on a rack, then invert onto the rack, removing the parchment. Let cool completely.
- Toast the 1 cup of coconut until golden for topping.
- Whip the 1 1/2 cups of cream, and fold 2/3 of it into the cooled custard for the filling between layers of cake, reserving the last 1/3 for the final layer of the dessert.
To assemble:
- Slice each cake into 2 layers, brush with the simple syrup, and then chunk up into bite size pieces.
- You can make these either individually in glasses, or for a crowd in a large glass bowl.
- Put a layer of cake pieces in the bottom of your container, then a layer of the custard mixture, continuing until your container is full, final layer being the last 1/3 of the whipped cream, and sprinkle with the toasted coconut.
- This is most delicious if you refrigerate it for a couple of hours so the flavors meld.
Apples are coming in off the trees by the crate-load. What is more quintessentially autumn than plucking an apple off the tree and enjoying it right there in the fall sunshine? I used to go apple picking as a child, and in those days we were allowed to climb the trees to pick. I can still remember the sensation of picking an apple at the top of the tree (or as top as I got) and then biting into the white sweet-sour juiciness. Not something one easily forgets! Well, I don’t climb trees anymore, but I do still pick apples (luckily our trees are dwarfed) and one of my favorite things to do with apples is an upside-down cake. I love upside-down cakes, and I think I have made them out of almost every kind of fruit that one can. Pear, plum, pineapple, rhubarb to mention a few. But nothing beats apple! I like to do this in a cast iron skillet — I think it tastes better, and it’s easy!
Apple Upside Down Cake
Print Recipe
Votes: 0
Rating: 0
You:
Rate this recipe!
Apple Upside Down Cake
SERVINGS
|
COOK TIME20 to 25mins. |
PREP TIME |
READY IN5 to 7mins. |
Ingredients
Instructions
- Preheat oven to 375 degrees
- In a 9 to 10 inch skillet, melt the 1 3/4 sticks butter over low heat.
- Add the 3/4 sugar and stir, then place apple slices, wedge side down in the pan.
- No need to pack tightly, but don’t leave gaps.
- Allow this to cook over low heat while making batter.
- In a bowl, measure out flour, salt, baking powder and cinnamon and set aside.
- In the bowl of an electric mixer, beat 1 stick of butter and 2/3 c sugar until light and fluffy.
- Mix in vanilla and eggs.
- Add sour cream and mix well.
- Gradually add flour mixture until just combined.
- Remove skillet from heat.
- Spoon batter over the top, then spread gently so batter is evenly distributed.
- Bake for 20 to 25 minutes, or until cake is golden and bubbly.
- Allow the cake to sit in the skillet for 5 to 7 minutes, then invert onto a serving plate.
- Best served warm with vanilla ice cream or whipped cream.